Categories
CAD - Design machine shop Project textiles

Pull Out Drawer

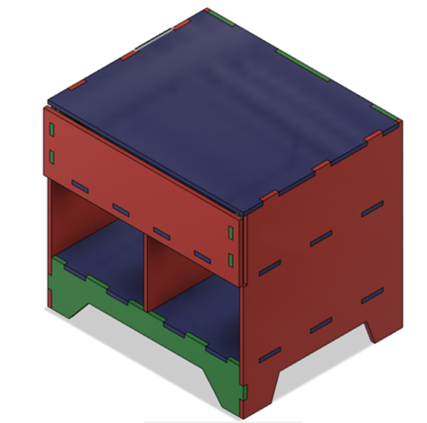
The Engineering department at Sacred Heart University created an electronics kit that included the necessary equipment to conduct their classes. The issue was there was a lack of storage in the space for them. Originally, I was tasked with creating a shelf to store them, but we soon realized that the boxes on the bottom would be too difficult to reach on a regular basis. My team and I settled on a pull-out drawer. I designed a drawer to hold all 16 kits as well as have room below to store two large containers with extra supplies.

After some measurements and evaluations, I was able to drill in place the rails which are rated to handle up to one hundred pounds when fully extended. This was necessary because of the weight of the drawer itself was constructed out of ¾ inch plywood.

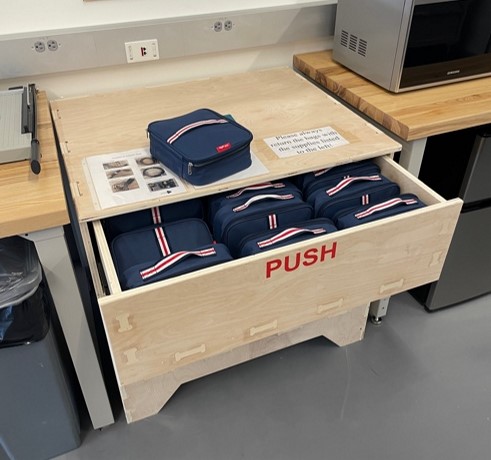
My main problem with the drawer was a miscalculation of the placement as the rails have a push-to-open mechanism. When pushed incorrectly the drawer would not open making it difficult to open the drawer. After moving the rails and cutting back some of the panels, I made the drawer flush, thus making it a press to open.

Categories
CAD - Design machine shop Project

Arcade Joystick

by Trevor Neal and Massimo Bacchiocchi

This event lets students build their own arcade joystick controller. It can be used with PC’s, Raspberry Pi’s and other emulators. The case for the arcade stick was designed in Fusion 360. Then, exported as dxf files and combined in CorelDRAW to fit on one 12 x 24 inch sheet of 3mm plywood. The combined file was laser cut on the Epilog Fusion Pro. The PCB, buttons, and joystick are all plug and play with no soldering required making it very easy for students to build. The PCBs are programmed using an emulation software or front end like retropie or libretro. They should be able to be remapped in games such as street fighter V on PC.

Equipment/Software:

  • Fusion 360
  • CorelDRAW
  • 3mm Plywood
  • EG starts Arcade Joystick lever
  • EG starts Light up Arcade buttons
  • EG starts Arcade stick PCB
  • M3 Screws
  • M3 nuts
  • M4 Screws
  • M4 Nuts
  • Epilog Fusion Pro Laser Cutter

Step by Step:

  • Designed the container in Fusion 360
  • Exported the file as a DXF
  • Laser cut out all the pieces on the Epilog Fusion Pro
  • Test fit the pieces
  • Screw in all the buttons and stick to the top case
  • Install the front two buttons
  • Screw the PCB board into the bottom of the container
  • Assemble the sides, plug in all the wires into the PCB, the buttons, and stick
  • Fully assemble the joystick controller

During the creation of the container housing the joystick, one of the challenges we overcame was determining how to best fit the button layout on the top face of the controller. We looked to the internet to see official designs of actual full-sized arcade cabinets and based our layout on theirs.  

Through this project we learned a lot about designing laser-cuttable containers in Fusion 360. I learned how to break down the full container model into different components making up each face. They could then be laser cut and slotted-in together.

Categories
3d printing CAD - Design Electronics - Arduino machine shop Project

Custom LED Lamps

by Bryan Bushey, Linnea Caraballo, and Trevor Neal

We designed custom LED lamps using LEDs and protoboards.

Equipment/Software:

  • 3D Printer
  • Wood
  • Soldering Stations
  • LEDs
  • USB Cable
  • Spray Paint

Electronics

We soldered 3 LEDs in parallel using a protoboard. We then took a micro-USB cable and cut off the USB end and stripped the wires so that it exposed the power and ground cables. We then soldered these to the LEDs so that they could be powered.

Final

The final design for the LED lamp was using a 3D printed lamp shade, a wooden base, and reusing hula-hoop parts to make the arm of the lamp. We then spray painted the base and hula-hoop part.

            This was one of the first electronic projects and workshops done, so it was a good way to get the hang of running workshops. It was also one of the first collaborative projects between multiple staff members and it allowed us to reuse parts that we no longer needed without having to throw them out.

Categories
3d printing CAD - Design Project

Shamrock Coasters

For our St. Patrick’s Day event, I let attendees write their own custom text on a 3D printed coaster with a shamrock on it. The coasters were designed as a disk shape with a raised lip on the edge. The lip is rounded into the disk to make a smooth slope up to the top of the shamrock shape. In the middle was a vector I found on the internet, and it is embedded 1.2mm into the coaster. The text is also embedded 1.2mm.

Equipment/Software:

  • Tinkercad
  • Prusa MK3S+ 3D printers
  • Overture PLA

Step by Step:

  • Designed the coasters in Tinkercad
  • Exported the file as STL
  • Made examples of the coasters with generic text to show people during the event what they should expect
  • Made a version of the shamrock coaster without any text so people would be able to add their own during the event

I tried making a coaster in the shape of a shamrock instead of just having a round coaster with a shamrock on it, but I was unable to make one that was visually appealing, so I just ended up using my original design. It also was difficult to get attendees to use the correct setting for their text so that the text was embedded into the coaster.

I learned a new 3D modeling software, onshape, to create first version of the coaster. This allowed me to learn a more advanced 3d modeling software. I now have the capability to create more advanced models. This event also helped my teaching ability as I had to teach a large group of students how to embed text into a shape.

Categories
3d printing Project

Words Matter Art Pieces

I was tasked with assisting Artist Mark Yurkiw in creating 3D scans of two of his art pieces, Yearning to Breathe Free, and Re-Birth of a Nation. The scans were modified to create miniatures of the art pieces to raise funding for the @#1 Main St. Galley Inc. a 501c3 non-profit raising awareness for local artist to local people. Yearning to Breathe Free will be sold at fundraisers and venues for the homeless as thank you gifts at certain donor amounts. Re-Birth of a Nation will be sold for fund raising events for children’s cancer research. I took the high-resolution scans using the Creaform Go!SCAN Spark 3D Scanner and modified the raw scans in Creaform’s VXelements program. For other modifications, I used Microsoft 3D builder, for example, the spokes on the Statue were too thin, so I used 3D builder to extrude the spokes. Originally, I 3D printed the prototype models on our Prusa MK3S and Ultimaker S5 printers, once I saw the quality of the prints, I determined that we should use SLA printing for a higher, more detailed resolution. We used the Formlabs 3+ and the Elegoo Mars 2 Pro for these demo prints.

Equipment/Software:

  • Creaform Go!SCAN Spark 3D Scanner
  • Creaform VXelements
  • Microsoft 3D Builder
  • Prusa MK3S
  • Ultimaker S5
  • PLA
  • Elegoo Mars 2 Pro
  • ABS Mint Resin
  • Formlabs 3+
  • White Resin

Step by Step:

  • The original art pieces to be scanned
Re-Birth of a Nation
Yearning to Breathe Free
  • 3D Scanned the two art pieces with the Creaform Go!SCAN and edited the models in VXelements
  • Re-Birth of a Nation in Prusa Slicer
  • 3D printed using FDM technology, lower detail
  • 3D Printed using SLA technology on Elegoo Mars 2 Pro, higher detail

During this project, the most challenging aspects were learning how to use SLA 3D Printing technology and learning to use the VXelements program to successfully scan objects in 3D.

Through the months working on this project, I learned the process of creating resin printing and understood what goes into creating a successful 3D scan, fully ready to be 3D printable.