Categories
CAD - Design Project textiles

Fashion Class

Sacred Hearts Fashion Innovation 299 course for the first half of the semester teaches innovation in the business world. For the second half of the semester, I took over teaching the class by training them in multiple badges including 3D printing, sublimation printing, and vinyl cutting. Before the class started at the makerspace, I took the assignments and projects they had to do in the makerspace, created a lesson plan, and created PowerPoints to open the different badge trainings. The lesson plan gives them time to get their badges as well as use the machines frequently, as well as make sure there is time allotted for their final project. Teaching the class involved multiple presentations to the class as well as teaching material and one on one work with students and groups to refine their work. Once they started working on the final, I was there as an aid to bounce ideas off and help make their dreams a reality with the use of the lab equipment.

LESSON PLAN OVERVIEW

  • 10/8 – Makerspace Tour and Overview of Technologies
    • PowerPoint about what the makerspace is
    • Tour with manager
  • 10/15 – 3D Printing Exercise: Part 1
    • Individual Project
      • Find a small print on Thingiverse
      • Slice it
      • Can be anything
  • 10/22 – 3D Printing Exercise: Part 2
    • Group Project
      • Theme “mask up”
      • Ideation session alone on what they want to make
      • Sessions includes:
        • Post it notes/word cloud
        • Reflect on the notes
        • Develop a sketch that represents your thoughts on the theme
      • Connect with your group and share your ideation process and designs
      • Center on one idea and create a proposal
      • Present the team proposal to manager/myself/class
      • Work with Cedric and makerspace team to design and execute your idea
  • 10/29 – Sublimation Printing
    • Introduction to sublimation printing via my PowerPoint
    • Teach them how to use Sawgrass to create
    • Ideation on the golden circle
    • Create a sketch, then recreate it in Sawgrass
    • Print out the design on the Sawgrass printer
    • Use the heat press to transfer the design
  • 11/5 – Vinyl Cutter
    • 10min – Dr. Dave presentation on vinyl cutting in fashion
    • How to use CorelDRAW all together
    • Badge training for the vinyl cutter by groups
    • Create and transfer your design in the makerspace
  • 11/12 – Final Project Phase 1 and 2
    • Ideation with group
    • Value Proposition and BMC sketching
  • 11/19 – Final Project Phase 3
    • Present your ideas to the class and get feedback
    • Continue to use makerspace tech for projects
  • 12/3 – Final Makerspace Day
    • Last day to work on project

Categories
3d printing CAD - Design Project textiles

Pi Holder

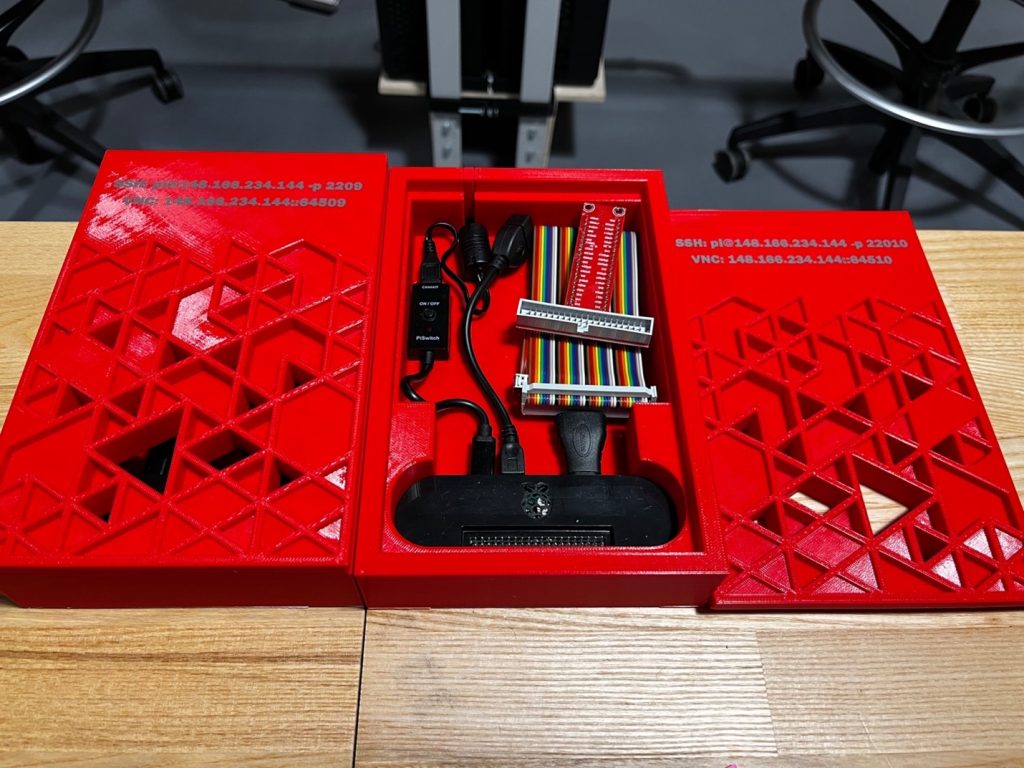
I designed a custom Raspberry Pi Zero holder for the desks.

Equipment/Software:

  • 3D Printer
  • Raspberry Pi Zeros
  • Ribbon cables/connectors
  • Fusion 360
  • Power cables

Prototype

I was not sure how to execute what I wanted to accomplish with the Raspberry Pi holders. At first, I wanted to attach the holders to the front of the desk legs in the middle so that they were out of the way but still accessible. However, after we 3D printed them, we could not figure out a good way to create brackets to secure them to the desk legs. We also realized that this was impractical, especially if we wanted to use the GPIO pins in the future. This Pi holder design would also make it so that the table couldn’t be moved around since they would bind two tables together meaning that a new Pi holder would need to be designed if the desks were ever separated. This led to us deciding to make Pi holders that will individually sit on top of the desk, yet still look coherent when next to each other in the current setup.

Final

The final design allowed for us to put the Raspberry Pi holders at the corner of a desk with the Raspberry Pi Zero snuggly fitting in and having enough space for the ribbon connectors and power cables. This makes the Pi holders able to hold the Pi’s and the accessories needed to utilize them to their full potential. These Pi holders needed to work effectively, but also be appealing to the eye which inspired the design of the lid. To design the lid, I started by creating a SVG file of triangular patterns then importing that into the Fusion using the extrude tool to create the different depths.

Another thing that I added to the final design was vinyl labels to access the SSH and VNC. To do this, we had to set up two port forwards per Pi allowing for anyone to connect to the Pi’s if they are on Sacred Heat Wi-Fi. This will allow for users to be able to see the full desktop and GUI of the Raspberry Pi with VNC or to just use the command line using SSH. It also allows for all GPIO pins to be accessed and usable with a breadboard making it easy to attach sensors, so the Raspberry Pi’s are fully functional.

Categories
CAD - Design machine shop Project textiles

Pull Out Drawer

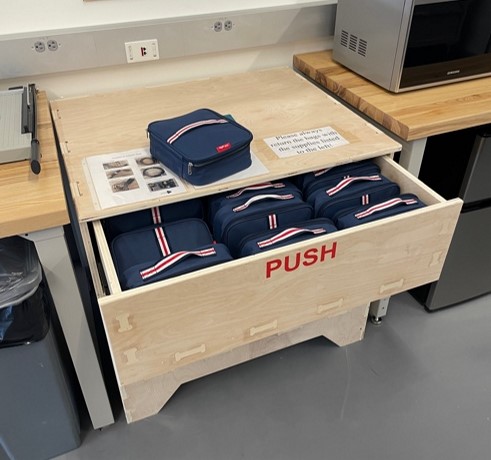
The Engineering department at Sacred Heart University created an electronics kit that included the necessary equipment to conduct their classes. The issue was there was a lack of storage in the space for them. Originally, I was tasked with creating a shelf to store them, but we soon realized that the boxes on the bottom would be too difficult to reach on a regular basis. My team and I settled on a pull-out drawer. I designed a drawer to hold all 16 kits as well as have room below to store two large containers with extra supplies.

After some measurements and evaluations, I was able to drill in place the rails which are rated to handle up to one hundred pounds when fully extended. This was necessary because of the weight of the drawer itself was constructed out of ¾ inch plywood.

My main problem with the drawer was a miscalculation of the placement as the rails have a push-to-open mechanism. When pushed incorrectly the drawer would not open making it difficult to open the drawer. After moving the rails and cutting back some of the panels, I made the drawer flush, thus making it a press to open.